Volume Control with Kilnformed Glass
Introduction
One of the first concepts a beginning kilnformer should understand is what happens to the thickness and shape of glass when it is fired. In order to successfully predict the outcome of any kilnformed glass piece, you need to understand the effect of heat on the thickness of fired pieces, and know how to use methods of controlling thicker work so that it doesn’t spread beyond the desired shape.
“Volume control”
This is the term we kilnformers use when discussing the relationship between the thickness of glass, and its ultimate size and shape when heated to full fuse or higher. For the sake of this discussion I will use inches rather than millimeters; and define a single layer of art glass as 1/8” (3mm) thick, two layers as 1/4” (6mm) thick, and a thin layer as 1/16” (1.5mm) thick.
Although glass does not have a “melting” point as many elements do, it does change its behavioral characteristics as it increases in temperature. As it approaches 1500F glass softens, and the solid sheets of glass begin to behave like a liquid. The thickness of a puddle of liquid on a solid surface is a function of the density of the liquid, the surface tension, the characteristics of the surface, and the force of gravity. Fortunately, for our purposes, we can say that molten glass in the kiln on a shelf will equilibrate at a thickness of about 1/4” thick – which conveniently equals the thickness of two layers of art glass.
This is a very important concept, and will often explain many unexpected firing results – or outright failures. But what happens when we fire one layer of glass, two layers, and more than two layers?
The One Layer Firing
If a square, one layer piece of glass is placed on a prepared kiln shelf and fired, there can be several possible outcomes, mostly related to the temperature of the firing. As the temperature approaches full fuse (~1500F) the glass (which is 1/8” thick) will draw inward as it equilibrates to the 1/4” thickness that the physics of glass dictates. The center of the long sides will noticeably pull in first as the temperature rises, followed by the corners. If the piece of glass is very small, it will round up into a bead with a flat bottom surface. Larger sheets of glass will develop holes as the glass is pulled away from some areas in order to give other areas the volume they need. Although single layers of glass can be slumped – full fuse firings of a single layer are often unsatisfactory.
The Two Layer Firing
When firing two sheets of 1/8” thick glass, where the total pre-fired thickness of the glass is 1/4”, little or no change in the shape and footprint of the glass results – as long as the glass is laid up properly (and assuming that the 1/8” sheets of art glass are actually 1/8” in thickness). In general, if two squares of 1/8” glass placed one atop the other, aligned exactly, and fired to between 1450-1525F (depending on your kiln firing characteristics) will result in a nice 1/4” thick square of glass. The edges will have a slightly bull-nosed profile, the lines of the square will have remained straight, and the corners will have softened from sharply angled to softly curved. This is demonstrated in the photos below.

The Three Layer Firing
When three or more layers of glass are placed atop one another and fired to full fuse the same physics comes into play but with the opposite effect as we saw in the one layer firing. There is now too much volume to maintain the original shape of the project and the footprint of the glass project will increase in size, and the thickness of the glass will decrease. How much this will happen depends on the time and temperature of the firing. Since the glass flows slowly it may not have time to equilibrate at 1/4” thickness – but at some intermediate thickness/size combination. Thicker round pieces may not change in shape, but they will increase the diameter as the glass flows outwards. For square and rectangular projects the crisp square will bulge out at the sides and become lozenge-shaped. This is OK if that is the expected shape– but in most situations it is not the desired outcome. Care also must be taken to ensure that as the piece enlarges it does not encroach on neighboring projects on the same kiln shelf, or spill off the shelf onto the kiln floor. The solution to this problem is to create a dam, or an enclosure for the glass to restrain the flow of the glass. This will be discussed later.
Two Layers with Design Elements
Very often, the design of kilnformed pieces will require that additional design elements be added on top of a two layer base. As more and more glass is added to a piece, the volume of glass increases and the issues of the Three Layer Firing will come into play. Fortunately, the glass is fairly forgiving of small increases in volume, and one can put a fair amount of additional volume on top of the two layers with impunity – as long as the design elements are kept a good distance from the edge of the glass (at least 3/4”), and the volume of these design elements are spread fairly evenly over the surface of the project. Using thin glass (1/16”) for the design elements instead of standard thickness (1/8”) will help minimize the volume effect.
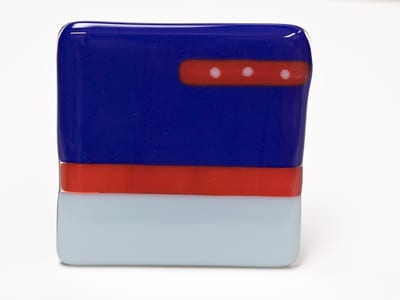
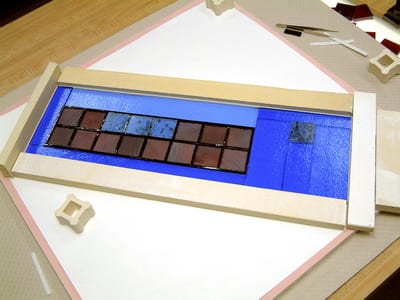
If there is too much volume too close to the edge, there will be bulges along the edges reflecting the increased volume in that area (as in the red, white and blue coaster below). Of course, the edges can be coldworked later to straighten them – but that may adversely affect the design, and it requires tools and time that may not be available. If the project is not taken to full fuse, but just to a temperature such that the design elements are tacked onto the surface of the piece – the volume will not be affected. This will allow design elements to be placed much closer to the edge of the base piece.
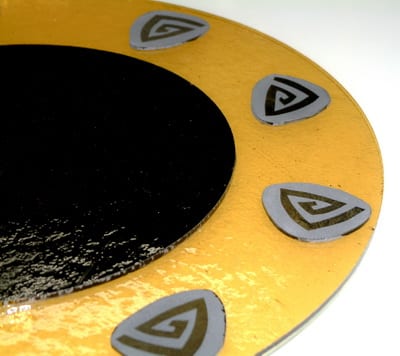
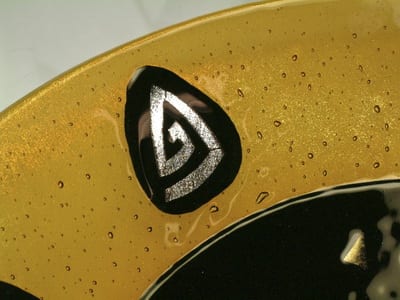
This problem can be avoided by careful attention to design element placement and volume. The photos below of the black and amber bowl edge are before and after firing of a 1/4″ thick piece with design elements added on top. In this case, the iridized black design element was thin (1/16″) glass to minimize the volume, and placed about 3/8″ from the edge, and brought only to a high tack fuse temperature. There was virtually no distortion of the edge because of these three factors. However, the trade off is that there is a slight three dimensional effect as the tack fused elements rise above the base surface.
Needling
Unfortunately, 1/8”or 3 mm art glass is not always exactly 1/8” or 3 mm in thickness. It is not uncommon to find a sheet that is slightly thicker or thinner than 1/8”. If your 3mm glass is only 2.5mm in thickness, and you use two such layers – your starting layup is only 5mm thick – which is 15% less volume than desired. Because of this your piece may shrink a bit as it equilibrates to 1/4” thickness. In the process the glass will drag across the kiln shelf or fiber paper as it moves. As it does this it may leave small “needles” of glass that remain as the glass pulls inward. To prevent this, (1) only fire as hot as necessary to get a full fuse, and (2) use the shelf surface that has the least friction. Shelf Primer seems to be one of the smoothest surfaces, followed by Thinfire™. A coarse fiber paper will accentuate any needling problem. When needling occurs the rough points it creates will need to be filed or ground off to prevent anyone handling the glass (including you) from getting cut. Avoid the urge to run your finger along the edge of the glass to determine how smooth it is after firing – you will most likely get cut.
Creating Thick Pieces
As mentioned above, if you want to create a kilnformed project that will ultimately be thicker than 1/4” in size you have to control the flow of the glass so it stays in the shape you have determined. The term used for this process is “damming” the glass. Dams can be made of any material that will not burn at the high temperatures involved with kilnforming. Popular choices are stainless steel and various ceramic materials, especially cut up mullite kiln shelves. The dam material must be lined with something that will prevent the glass from sticking to it. Sometimes brushing shelf separator on the damming material is adequate, but usually a layer of refractory fiber material is also used. I usually use 1/8” fiber paper, and if I want to make the edge of the glass as smooth as possible, I also line the inside of the fiber paper with Thinfire™ paper.
The final height of the dammed glass is usually a bit less than it was before firing. Because of this, the same issues about “needling” that we discussed before are in play here. But in this case, the needling occurs around the top edge of the glass as it drags down the side of the fiber paper. To prevent this, make the fiber paper lining the dam slightly less in height that the final thickness the glass will attain. A good rule of thumb is to cut the fiber paper surround 1/8” less than the height of the project. For example, if you are using four layers of glass (i.e. ½”), cut the fiber paper 3/8” in height. This will result in a nice rounded edge all around the top of the glass with no needling.

Building Dams
The material you use to dam your project may depend upon what you have available. One of the most commonly used dam material is cut up kiln shelves. If you have a shelf that is cracked or warped – don’t throw it out. Cut it into strips with a tile saw (don’t use your lapidary blade, but rather the inexpensive tile blade that may have come with your saw). Pre-made damming material can also be purchased in the form of strips or bricks.
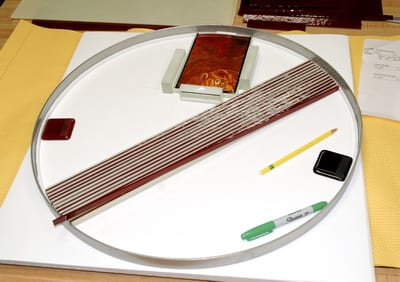
Stainless steel dams are very nice (as in the circle below) and they can be purchased in squares, circles, rectangles or ovals. As you may know, stainless steel contracts slightly more than glass does upon cooling – but the fiber paper lining will create enough of a buffer to prevent the steel from contracting too tightly around the glass. The photo on the left shows the initial stages of assembling a piece withing a stainless steel circle.
Alternatively, it is possible to first create your glass project, and then build a dam around it – by surrounding the shape with fiber paper, and then with ceramic or metal dams; or you can create the dam and subsequently build the project inside the walls.
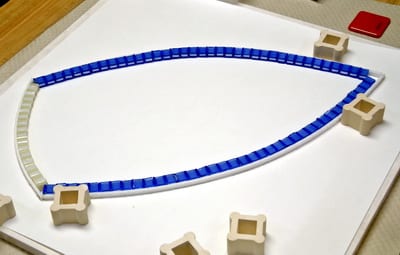
A technique for creating unusual shapes is to:
(1) draw your shape on a sheet of Thinfire ™ paper;
(2) run a bead of Elmer’s Glue on the line;
(3) cut a strip of 1/8” fiber paper and glue it on edge into place;
(4) let the glue dry and then build your project inside the fiber paper;
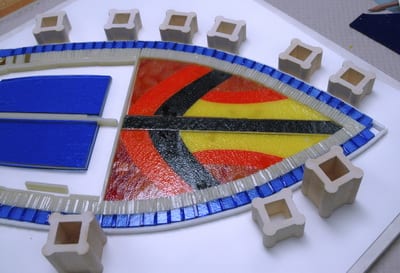
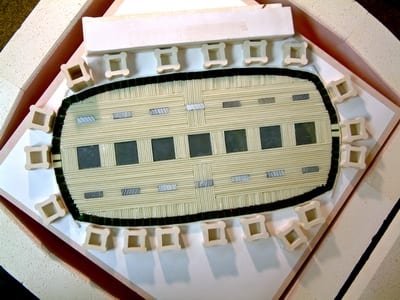
(5) surround the fiber paper and glass with many small pieces of damming material or kiln furniture and then fire. The damming material is necessary because the glue will burn off before the glass has fused and there will be no containment to prevent the glass from spreading. Just remember that if you create inside curves or corners you may need to be imaginative in figuring out how to coldwork those edges after firing.
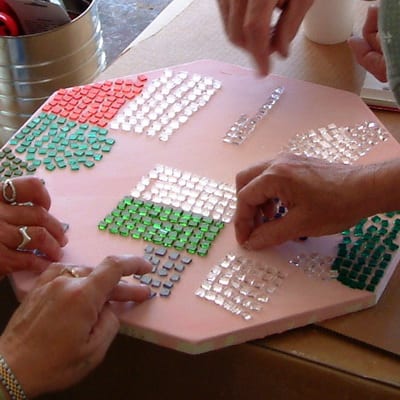
These photos show the initial stages of creating an unusual shaped design within a strip of fiber paper held in place with Elmer’s Glue.
Edge Treatments
Any time you create a thick piece with dams, you may find that the edge after firing is rough – and will require coldworking, as in the photo below. For more detailed information on coldworking edges, see my separate tutorial on this subject.
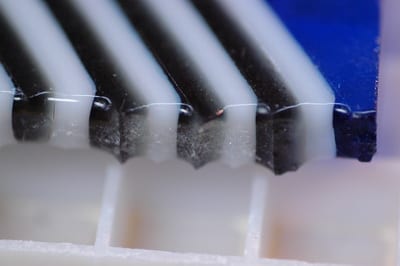
A typical rough edge after firing with a fiber paper dam
The best ways to avoid the rough edges, if you don’t have coldworking tools is:
Line the fiber paper with Thinfire™ paper.
Consider having pieces of iridized, clear glass around the edges of the piece with the iridized side facing out. The metallic iridized surface of the glass will generally not stick to the daming material.
Make sure you follow the instructions above regarding cutting the fiber paper dam 1/8” shorter than the height of the glass.
It takes real attention to detail and precision cutting and assembling to create a thick piece that is acceptable without coldworking – but it can be done. However, in most situations, you will need coldworking tools and skills to create professional looking edges.
Conclusion
Mastering the issues pertaining to thickness and volume control is mandatory in order to avoid failures. I hope this article has given you some basic concepts to help you create successful kilnformed work.
This article was first published in Glass Craftsman, Summer Issue, 2010.