Strip Cut Construction
By Steve Immerman
First Published in Glass Craftsman, Issue No. 206, Feb/Mar 2008
Introduction
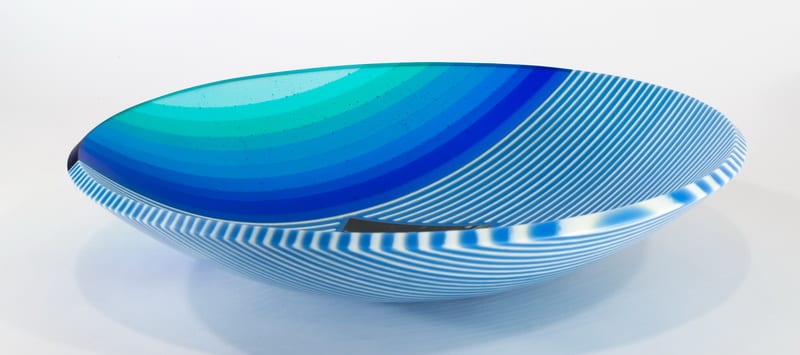
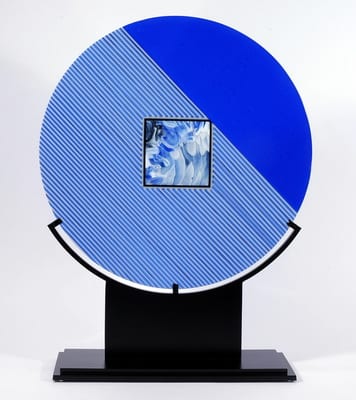
Many glass artists begin by working with stained glass, which is usually two dimensional construction, with the glass laid out in a single thickness and assembled using either lead came or copper foil. Fused, or kilnformed glass is a process that not only allows, but encourages thicker and more complex projects, opening up a myriad of new possibilities of creating art out of sheet glass. Most of my work over the past four years has been made using a technique called called “strip cut construction”. With this technique, I am able to create one-of-a-kind pieces that contain designs, such as that shown in to the right. Klaus Moje is the artist to which this the development of this process is usually attributed.
The Process
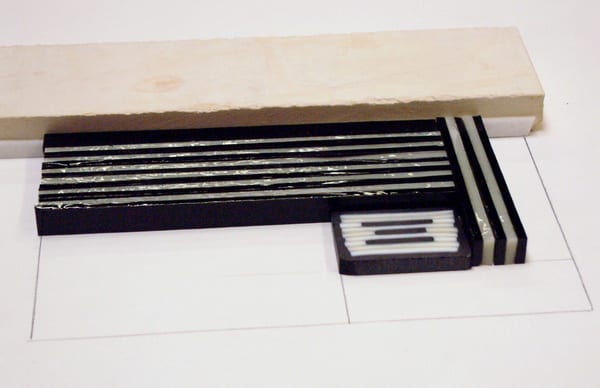
In strip-cut construction of a fused glass piece, strips of glass are cut from sheets of glass, and assembled on edge, rather than laid flat. This technique not only lends itself to designs with geometric and linear components, but also produces an almost bubble-free final piece. The process begins by determining the size and shape of the project to be created, and then drawing the outline of the project on a piece of Thinfire® paper. This refractory paper performs a dual purpose – is used to cover the kiln shelf, preventing the glass from adhering to the shelf during firing, and is also very useful for drawing the design guidelines for the project. One can draw just the outline, or draw a complete layout of the design. Thinfire paper can also be run through a laser printer if a complex drawing needs to be reproduced. After firing, Thinfire® paper gives the back of the glass a smooth, slightly textured surface. I feel that it is preferable to shelf separator (kiln wash) because it minimizes the chance that particles of the shelf separator will find its way between the many strips of glass during firing.
The Thinfire® paper is then placed on the kiln shelf. The shelf can be in the kiln, and the project assembled inside the kiln, or the shelf can be placed on your worktable and moved to the kiln after assembly. The type of kiln you have will determine if construction within the kiln itself is even a possibility. A front-loading kiln or a very deep kiln would make this awkward; while a bell or clamshell type kiln would make it easy.
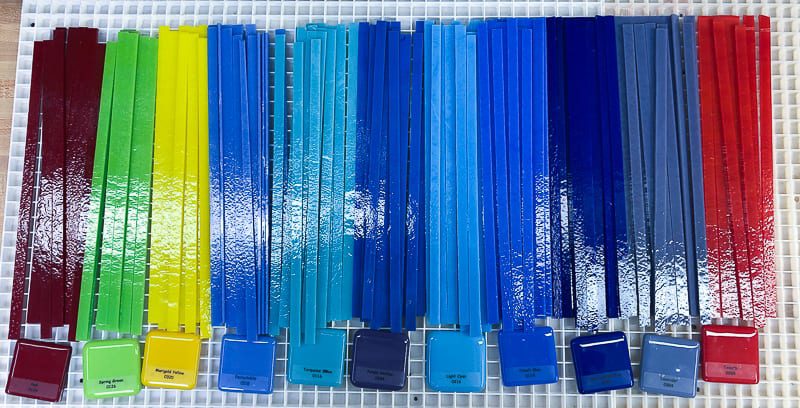
Once the design and colors have been chosen, sheets of compatible sheet glass are cut into strips for the desired thickness of the finished piece. Three eighths of an inch is a reasonable thickness; and easier to cut than 1/4″ strips, but any thickness can be used. The glass can be cathedral, opal, or a combination; and the piece may also contain design elements that are not of strip cut construction, such as pre-fired pattern bars, aperture pours, squares of solid color, frit patterns etc. The strips can be very long, or very short. Pieces composed of very short pieces can resemble mosaics.
Cutting the glass
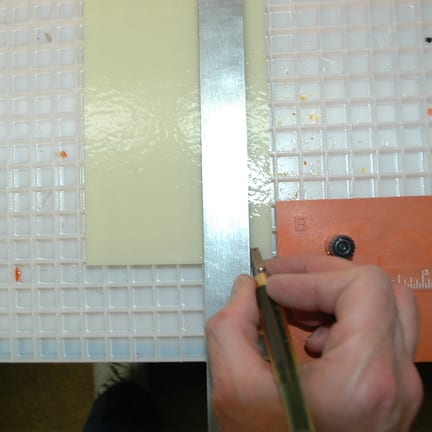
Cutting large quantities of strips can be a difficult and tedious task; particularly since art glass is often slightly textured. There are various methods and tools to do this, but a simple cork backed straight edge, running pliers, ruler, and hand held glasscutter are usually sufficient. One trick is to first cut the glass into thicker strips than needed, and continue bisecting the strips until the final width is achieved. For example, if 3/8″ strips are required, cutting 3″ wide strips – then 1½” strips – then 3/4″ strips – then 3/8″ strips prevents frustrating breakage. It is helpful to pre-cut the amount of strips you estimate you will need, so you can concentrate on design and assembly during the next step.
For more on cutting glass, check out this tutorial dedicated to the subject.
Damming the piece
If the project is thicker than 1/4″, you will need to create some kind of enclosure to contain the flow of the glass during firing. (Even if the piece is only 1/4″ thick, dams will keep the components from moving during fusing.) Without an enclosure, or dam, the glass will spread out as it tries to equilibrate at a thickness of 1/4″. I use strips of ceramic kiln shelves for the dam material, but stainless steel strips or pre-made stainless steel shapes will work also. I line the damming material with 1/8″ of fiber paper. If a smoother edge is desired, an inner layer of Thinfire® paper can augment this. I cut the fiber paper and Thinfire® 1/8″ shorter than the thickness of the piece. So, for a project that will be 3/8″ in thickness, 1/4″ strips of the fiber paper and Thinfire® will be needed. This will allow the surface tension of the glass to stay above the level of the fiber paper, and will minimize a rough, “needled” edge when the pieces of glass are fused together.
Assembly
The project can be assembled within the dam, or alternatively, it can be assembled with temporary weights or rulers holding the project in place as it is assembled – and the dam and fiber paper lining added as a last step. Whether the project is assembled starting in the center of the design and working outwards – or starting in one corner and working down and out – depends on your preference, and on the particular design. As assembly progresses, the strips of glass can be cut to the needed length either with a glass cutter or a mosaic nipper. One nice aspect of a strip-cut project is that it lends itself to on-the-fly design changes if it does not look right as it the lay-up progresses. There are both advantages and disadvantages of creating strip cut pieces in this technique. The advantages are the types of designs you can create, and the absence of trapped bubbles. The disadvantages are that some degree of edge grinding and polishing will be necessary. And, in some situations, grinding and polishing of the surface of the glass may also be desired. All of these steps requiring additional tools.
After the piece has been fired, the top and bottom sides of the project will look distinctly different. The top will be smooth and glossy, but the lines between the strips of glass will have a wavy, organic appearance. The bottom of the piece will be satiny rather than glossy, having picked up a texture from the Thinfire® paper. It may also have picked up any imperfections on your kiln shelf, but it will have crisp, straight lines between the strips and the design elements. It is quite acceptable to use either side as your display side – but it is best to decide this during the initial design process to avoid disappointment.

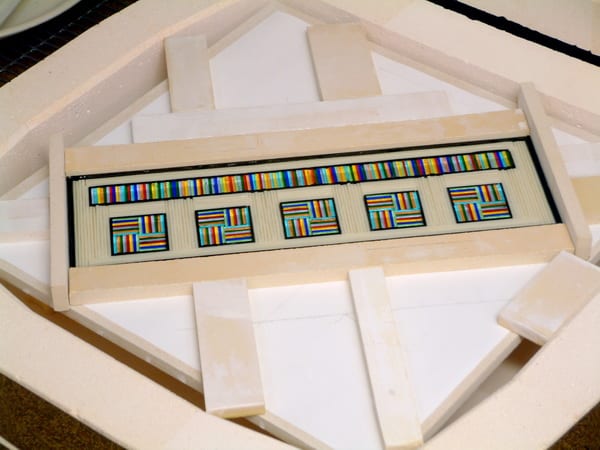
Once construction is complete, and the dams are in place, and the shelf is in the kiln, some additional supports are usually added to insure that the dams do not move during the firing process. Although the glass does want to spread out at high temperatures, this does not present any enormous outward force – yet it is worth making extra sure that your dam assembly will stay precisely in place.
Firing the project
Here is a sample firing schedule for a 3/8″; thick strip cut project composed of Bullseye Glass. Any of the variables may need to be adjusted based on the behavior of your kiln.
300 dph to 1150 F. Hold for 20 minutes
50 dph to 1250 F Hold for 45 minutes
500 dph to 1490 F Hold for 10 minutes
AFAP (as fast as possible) to 900 Hold for 2 hours
100 dph to 800 F No hold
200 dph to 700 F No hold
300 dph to 300 F Off
Let the kiln cool to room temperature before removing and handling glass. While removing the glass and cleaning out the kiln avoid inhaling dust from any fiber paper or Thinfire® paper by having a well ventilated room, using a vacuum with a HEPA filter, and wearing a mask (in particular, a NIOSHA Particulate mask fitted with a P95 filter).
Clean up and Coldworking
There may be sharp points along the edge, so be careful when handling the fired piece. The edges will almost always require grinding and smoothing with a tool such as a wet belt sander. If the piece is going to be slumped into a mold, it is best to smooth the edges before slumping.
You may find that the piece did not end up exactly square, round, or rectangular, so the shape may need to be slightly adjusted. If it is too long in one dimension, or not quite round, it is best to accurately mark the correct dimensions directly on the glass with a Sharpie marker, or something similar, and then cover the mark with paste wax (or Chapstick will do as well) to prevent the markings from quickly disappearing during the grinding process. (See my tutorial on coldworking the edges with a wet belt sander.)
A wet belt sander (WBS) is a very versatile tool for both rounded and angular shapes. Starting with a 60 or 80 grit belt, the edges of the glass should be ground so they are smooth, and any adjustment in shape has been accomplished. Progressively finer grit belts are then used (120-220-400) to continue smoothing the edge to a clean, professional finish. A cork belt will continue to give an even higher sheen. Firepolishing at this point is another option.
Conclusion
Strip-cut construction can be used for simple projects such as small plates or for more complex pieces, such as sculptures, bowls, and wall hangings. I hope this article has piqued your interest, and you give it a try.