By Steve Immerman
First published in Glass Craftsman, Issue No. 210A, Oct/Nov 2008
Introduction
A sandblaster is one of the most useful tools that you – as a kilnformer – can have , but unless you have been introduced to the concept behind this tool it can be quite mysterious and intimidating. I hope this introduction will take away some of the mystery.
What is a sandblaster?
A sandblaster is a machine that uses compressed air to propel particles of abrasive. The high energy of these abrasive particles will chip away tiny, precise bits of glass from the surface of the glass being blasted. Although the name of the tool implies that sand is used as the abrasive, sand is not the best abrasive for use on glass.
Selecting and Purchasing Sandblasting Systems
There are two basic sandblaster setups: the pressure pot blaster, and the siphon blaster, and there are pros and cons to each. Pressure pot systems have a separate reservoir to hold the blasting media. They are generally felt to be preferable because they blast faster, use compressed air more efficiently, and can be used at lower pressures – which will put less strain on your compressor. However, they require that the abrasive be periodically removed from the blast cabinet and returned to the reservoir. Siphon systems are initially more economical and allow continuous blasting without having to recycle the abrasive from the cabinet to the pot. However, because a siphon system can require up to five times more air flow it may require a more costly compressor.
Both systems need similar components: a blasting cabinet, a dust collector, a compressor, and abrasive. Many companies sell complete systems, and if you have the money this can make the purchase of a sandblasting system less intimidating.
Cabinets: The blasting is usually done within an enclosed cabinet. A good quality cabinet will be well sealed to minimize leaking of abrasive onto the floor, have adequate access to get your project into and out of the cabinet, and have a good sized window and adequate lighting so you have adequate visibility as you are blasting. Obviously, the dimensions of the cabinet dictate the maximum dimensions of the glass piece you can blast. The image above-right, shows my sandblast cabinet with the cylindrical, silver, pressure pot to its immediate right. My system was purchased from Glastar.
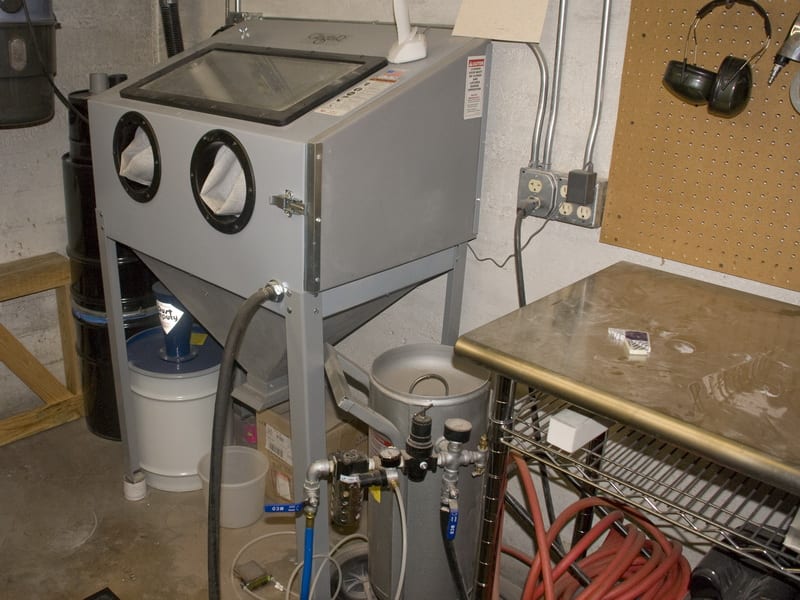

Dust Collector: This is a vacuum that attaches to the cabinet and applies negative pressure to evacuate the dusty air as you blast. If you can, it’s best to vent the exhaust from the dust collector outside your studio to minimize dust in your work area; but if you can’t, there are filters that can be attached to the exhaust outlet instead. A shop vacuum can be used, but dedicated dust collection units are quieter and will facilitate the safe removal of dust from the workshop. A dust collector is shown in the image to the right. The dust collector is the tall black unit on the floor to the left of the cabinet. I also have a “Dust Deputy” connected in between the two. This lessens the amount of fine dust that enters the dust collector, and will prolong the life of the motor in the dust collector. I also recommend getting the optional HEPA filters for the dust collector.
Compressor: Many workshops already have compressors for other uses, and often these can be used for the sandblaster. If you have to purchase a compressor for your sandblaster setup, you will have to weigh cost, physical size, and noise. There are many, many choices of compressors – but the key specification to evaluate is the airflow that the compressor generates, often referred to in terms of CFM at 90 psi (cubic feet per minute at 90 pounds per square inch). Make sure that you match the CFM to the requirements of the blaster. Keep in mind that lightly blasting the surface of the glass will require less pressure and less airflow than deeper blasting at high pressures. In general, you don’t want the compressor motor running continuously as you blast. If it is running continuously, you are putting excessive wear on the compressor and probably exceeding its airflow capacity. My compressor is a Campbell Hausfeld VT6271, which has worked well for my needs.
Abrasive: The two types of abrasive commonly used for sandblasting glass are aluminum oxide and silicon carbide. Silicon carbide is a very hard and aggressive blasting medium, and works very well for any kind of blasting, especially deep carving. It lasts a long time and, although it is initially more expensive, in the long run it may be more economical. Aluminum oxide is less expensive to purchase, but will not last as long because the abrasive particles break down and turn to dust more quickly. Blasting with aluminum oxide generates static electricity, and the user can be subjected to surprising, minor, electric shocks.
Various grit sizes are available with either medium, but 80, 120 or 220 grit would be typical sizes for kilnformers to use. As you would expect a coarser grit size (lower number) will blast faster, but leaves a rougher surface. Unfortunately, it is a major project to switch grit sizes in your blaster, so most people will chose one size that works best for most of their needs. I have found that glass blasted with aluminum oxide and subsequently firepolished appears superior to glass blasted with silicon carbide and firepolished. However other glassworkers have had different experiences. I use 220 grit aluminum oxide in my blaster, and I purchase it from McMaster-Carr, part number 3418K93.
For more on why I chose Aluminum Oxide check out this page.
Where to locate your sandblaster
This tool generates both dust and noise. The noise is from both the compressor and the dust collection vacuum. Either of these could be located in a room adjacent to the blasting setup, or even outside, to minimize the noise that you are exposed to while you are sandblasting, but not everyone has that luxury. Wearing noise canceling or sound dampening ear protectors is a good idea. This is also a tool that can create a fair amount of fine dust which gets in the air and lands on the floor. Having a well sealed cabinet and an externally vented dust collector will minimize this. During the actual blasting there may not be any dust propelled into the room. But, when abrasive is being added to the system or the cabinet door is opened dust will escape from the cabinet, and wearing a mask is wise (in particular, a NIOSHA Particulate mask fitted with a P95 filter). Installing an exhaust fan in the room for use during these times will prevent this dust from finding its way into other areas of the studio.
Customizing your sandblaster
Even when you purchase a complete system, there are a few things that may make use of the blaster easier. Most important is to install an extra light into the cabinet. There is never enough light in these dusty cabinets, and I’ve found that a second one is helpful. Secondly, have some sort of rubberized surface on the floor of the cabinet to protect the back of your pieces from scratches. I’ve used some rubber floor mats with a cut-out, open pattern. This allows the abrasive to fall into the bottom of the cabinet, but provides a softer surface for the glass. It is also helpful to create some sort of holder for the glass within the cabinet so that you don’t have to constantly hold the glass with one hand while you hold the nozzle and blast with the other. These can be made of wood and a few nails, and can make blasting much easier.
As mentioned above, the dust collection setup of most commercial units can also be improved. The particles generated within the blast cabinet are so small they can pass through basic air filters. It is important to upgrade to HEPA (High Efficiency Particulate Air) filters both for safety and to prevent dust from making its way into the dust collector motor. There are also dust collection reservoirs that attach between the blasting cabinet and the vacuum to remove particulate material before it reaches the dust collector (“Dust Deputy“).
Using the sandblaster
First, the compressor is turned on and allowed to build up maximum pressure, at which time the compressor motor will stop running. The valve from the compressor to the blaster or pressure pot is opened as well. Depending on your type of setup, there are a couple of pressure valves that have to be set – but these are unique to your system so I won’t try to go into that here. All systems will have one valve that controls the pressure of the air and abrasive being propelled at your glass. You will adjust this depending on exactly what kind of blasting you are doing. Ballpark numbers would be: light blasting around 15-20 psi, surface blasting around 30-40 psi, deeper blasting above 65 psi.
Before you open the door to the cabinet, turn on the dust collector vacuum to exert negative pressure on the cabinet. Then, open the door and put the glass into the cabinet. Insert your hands into the gloves built into the cabinet. Grasp the hose with a nozzle that will be in the cabinet. Hold the nozzle a couple of inches from the glass, and initiate the air and particle flow through the nozzle by either pulling the trigger or stepping on the foot pedal, depending on your particular setup. It’s best to position the glass in a position relative to the lights so you get reflections, which will help show you the effect of the blasting. Shiny glass will develop a matte finish as it is blasted. Use a slow, deliberate back and forth motion as you blast across the piece until the entire surface has been blasted. Then, remove the glass from the blaster and examine for places you may have missed; and then return it to the cabinet and continue blasting until the job is done. You can use a Sharpie marker to mark the areas that need additional blasting – the marker will disappear as the area is blasted.
Uses for a sandblaster
There are several important uses for a sandblaster which makes it an indispensable tool for kilnformers.
Fixing surface problems: One common use of a sandblaster is to remove shelf separator that has adhered to the back surface of glass during firing. Although there are manual methods of removing this, none is as easy and successful as a light sandblasting (15-20 psi). When the back side of a piece is sandblasted it will have a dusty, frosted appearance. This will stay dusty and frosted looking if slumped as the next step. If a glossier bottom side to the piece is desired, either a separate trip through the kiln for firepolishing is needed, or a product can be applied after slumping, such as Armor All, Liquid Luster, or Watco Oil.
Repairing surface devitrification: As any experienced kilnformer has found out, there are times that kiln fired glass develops a haze due to a crystallization of the surface glass molecules. This is called devitrification. It is less common with art glass specifically formulated for kilnforming – but it still occurs at times, especially with glass that hasn’t been scrupulously cleaned, opalescent glasses, glass in close proximity to Thinfire® paper, and glass that is fired at high temperatures for long times. Once this occurs the haze cannot be removed without some sort of process which actually removes the outer surface later of the glass. Options include manual grinding with diamond products, chemical etching – or, best of all, sandblasting. A light blasting of the entire surface of the glass, including the edges, and then subsequent fire polishing at a lower temperature than the original firing will yield a glossy surface.
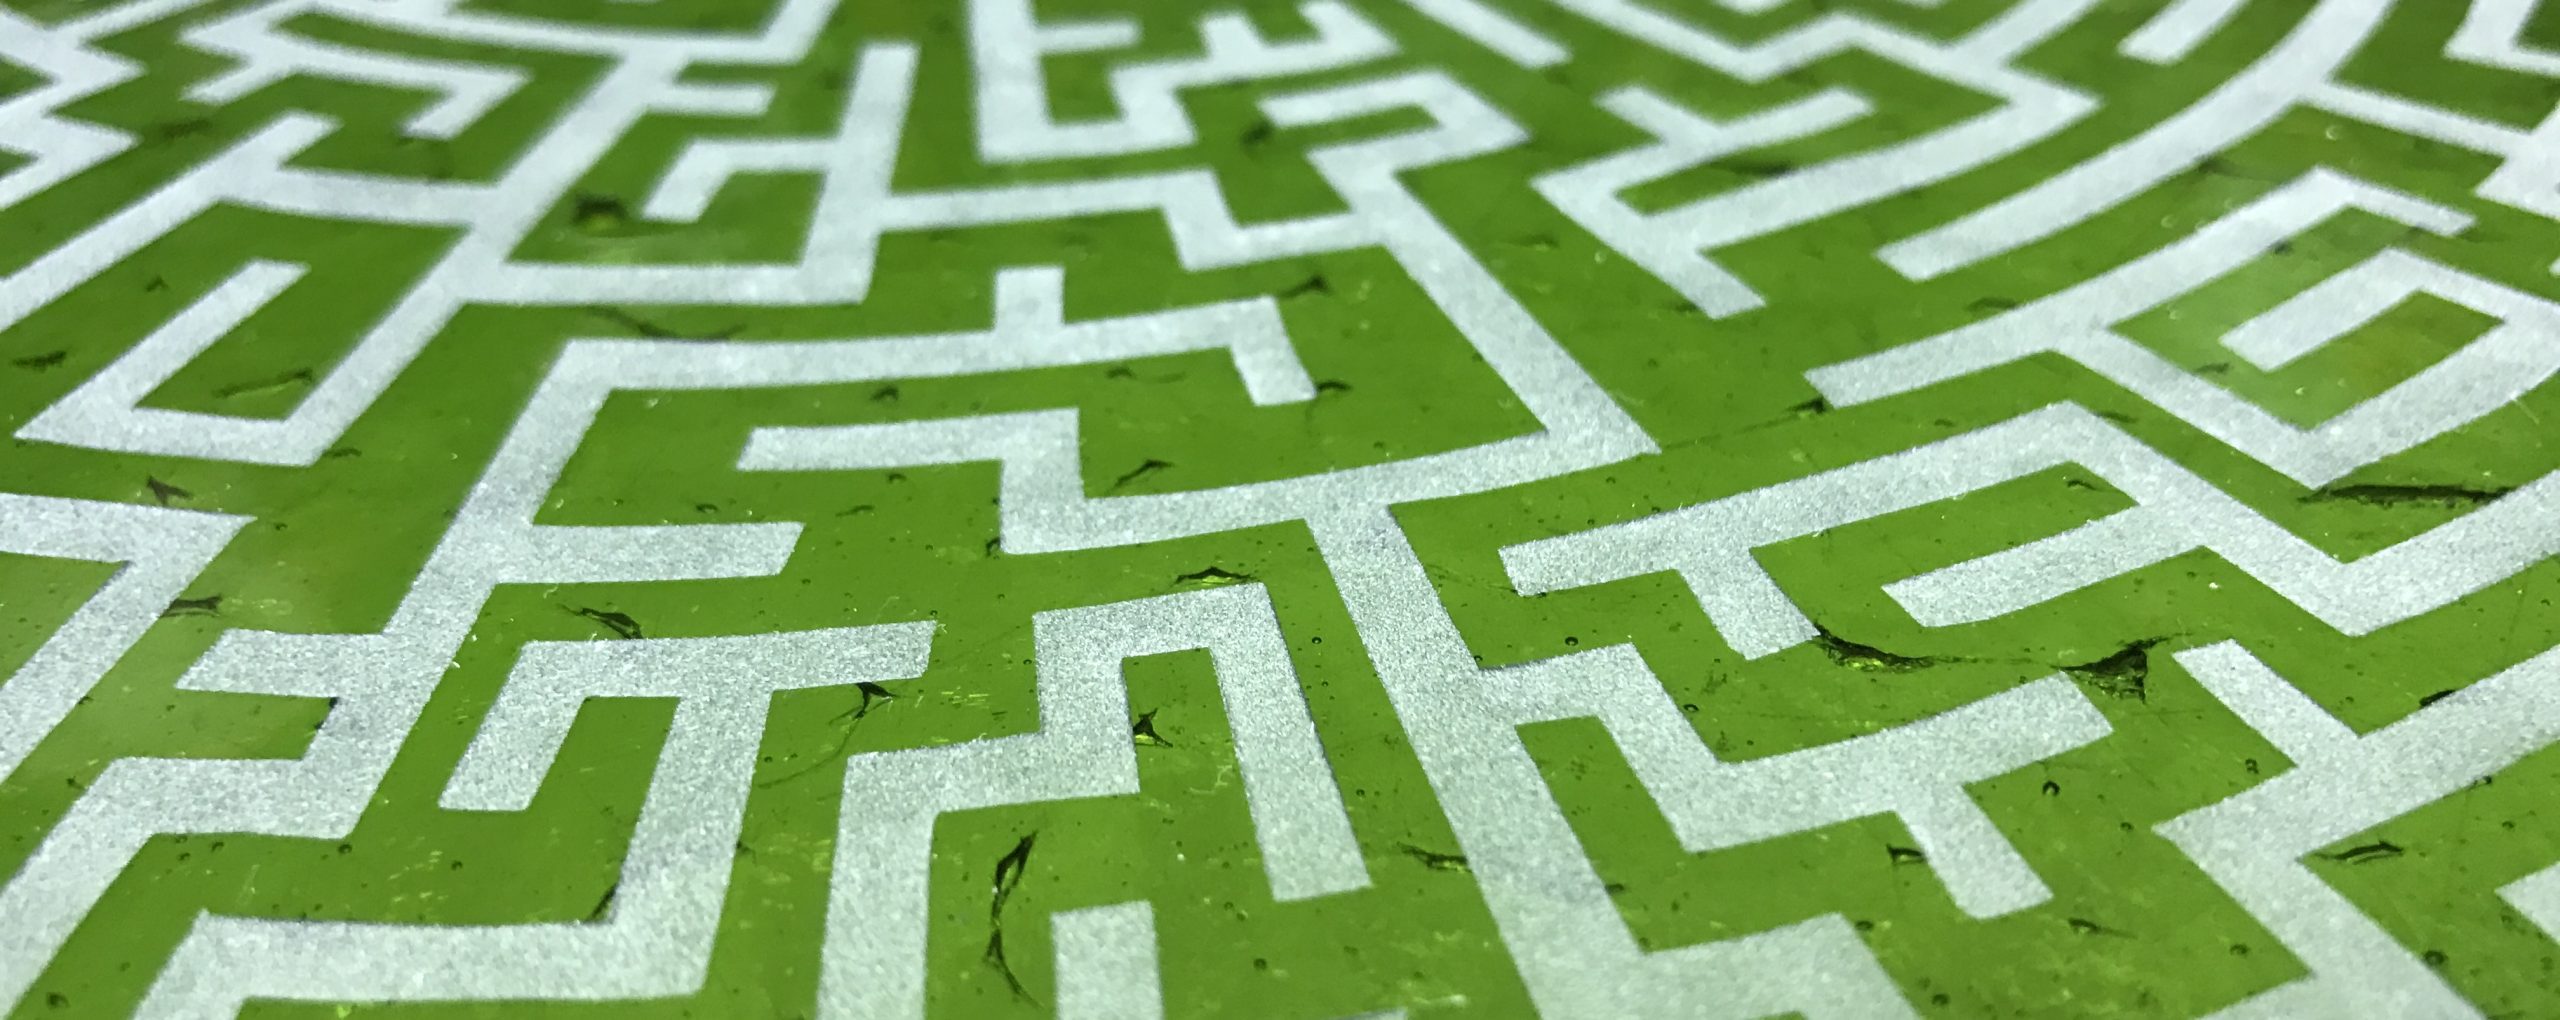
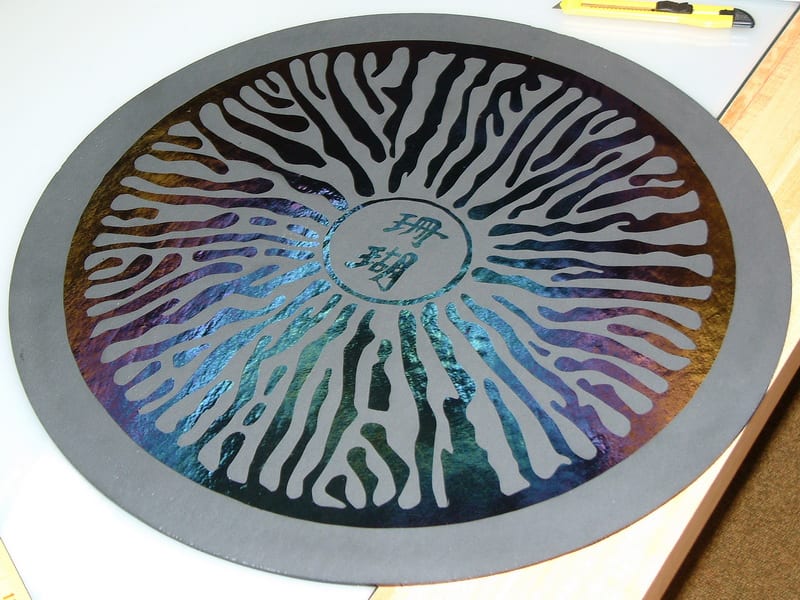
Removing surface debris: There are times that mysterious spots appear on our fired glass. These can be caused by debris falling from the roof of our kilns, small particles of glass that get in the wrong place, or metal dust from our work surface that adheres to the glass. If you’re a perfectionist, one tiny spot can ruin an entire project. Often, the only way to make a repair is to sandblast the surface until the spots are gone, and firepolish at temperatures around 1340-1390F. Removing iridized coatings: Glass for kilnforming can be purchased with an iridized coating, and there are times that we want to remove some of this coating for artistic or technical reasons. Light blasting is an excellent way to accomplish this. (see image on top of page) Obtaining a matte finish: Although many people like their glass projects to be bright and shiny, there are times when a matte or semi-gloss finish is preferable. Lightly blasting the surface and refiring to slumping temperatures (1100-1175F depending on your kiln and the hold time) will give a very nice, non-glossy surface.

Removing iridized coatings: Glass for kilnforming can be purchased with an iridized coating, and there are times that we want to remove some of this coating for artistic or technical reasons. Light blasting is an excellent way to accomplish this. (see image on top of page)
Obtaining a matte finish: Although many people like their glass projects to be bright and shiny, there are times when a matte or semi-gloss finish is preferable. Lightly blasting the surface and refiring to slumping temperatures (1100-1175F depending on your kiln and the hold time) will give a very nice, non-glossy surface.
Conclusion
There are many other ways to use a sandblaster for glass art – and I’ve just scratched the surface of the subject (no pun intended…). Hopefully, this article has made you aware if the many uses, and has given you enough information, to consider purchasing a system of your own.